We updated the video that reviews what you get when you download your free Purchase Order Software.
Feel free to Like and Share. Thanks!
We updated the video that reviews what you get when you download your free Purchase Order Software.
Feel free to Like and Share. Thanks!
Our YouTube Channel is approaching 80,000 views.
And the video that reviews our Free Purchase Order Software is about to hit 25,000 views itself.
Aside from helping you implement the free version of SpendMap, our video tutorials are a good way to learn about the benefits of e-procurement software in general.
Thanks for your time and interest.
– The Free-Procurement Project Team

Todd was trying to refresh his Testing (“sandbox”) copy of SpendMap so that it has the same data and configuration/settings as his Live (“production”) copy, using this menu option…
– PURCHASING > Setup system > Test environment > Create a TEST system from your PRODUCTION system
…but he got the error message “This does not apply to the free version (A test system was already installed in your free folder)“.
Sorry about that Todd. That menu is only used in our paid (commercial) version. We use a different approach to manage Testing Systems in the free version of SpendMap.
When you install the Free Version, you will get a folder in your Desktop called “SpendMap Free Version” with five shortcuts in it, one of which is the SpendMap Test System…
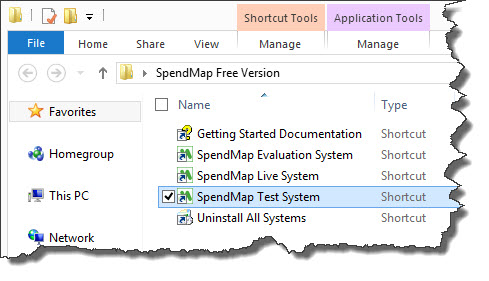
To refresh the data in your Test System, just run that shortcut and you will be prompted for the location where your Live System is installed, so that it can be copied. If you’re not sure, just log into your Live System, select the menu Help > System Information, and see #8 “Shared File Location”.
Reminder: Use of the Test System is not always necessary. You can also do testing in your Evaluation System, which is preloaded with sample data and the most popular settings. That said, if you want to test something that might be affected by the settings or data in your Live System, then that’s what the Test System is there for.
Ed wants to use the free version of SpendMap to track costs to projects/jobs at his engineering and construction company in Iowa. Ed asked…
“Is it possible to set up the Chart of Accounts to do Job Costing. I would like to report on Job Number, then Labor, Material, Equipment, Subcontractor, Other and Tax. Many Job numbers, but always the same cost categories.”
Yes. You can learn all about the various “account code” fields, and how you can track charges to those accounts, in the following section of the Online Help…
– System-Wide Features and Information > Master Files > Account Coding (Overview & Guidelines)
Ed would likely rename the Cost Center field to “Job”, and the GL field to “Cost Category” (or similar). All the account code fields are user-definable, so you can rename their titles, but “cost center” is typically used to track “who or what” is using the item being purchased (Jobs in this case), while GL Account is usually used to indicate the type of item being purchased (what Ed describes as “cost categories”).
For more about why we normally suggest using the Cost Center and GL fields specifically rather than the other account code fields (one of which is already called “Job” by default), please see the subsection “Account Code Fields and Segmentation”, and specifically the link for “About Cost Centers and G/L Accounts” in the above section of the Help.
“Also, could the system report against a budget in each of the categories?”
Yes, you can track and report on your budgets, by Cost Center (Job) and by GL (cost category) within each Job. For more details, please see this section of the Help…
– System-Wide Features and Information > System-Wide Features and Utilities > Cost Center History and Budgets (About)
And if you’d like to see an example of how to set this up, just go into your Evaluation Copy of SpendMap (the one with the sample data) and take a look at the [Matching G/L Accounts/Budgets] Folder, for the Cost Center “SYSTEMS” (IT Department), in here…
– PURCHASING > Master Files > Cost Centers > Add/Modify/Delete
You will see that the SYSTEMS Cost Center has separate GL-level budgets specified for various types of “spend categories”, like IT purchases, office supplies and freight charges.

You may have noticed that there is more than one way to export items, suppliers, PO history and other data out of the Free Version of SpendMap. I am referring to the “Export Any Table” utility versus the “dedicated” export utilities under UTILITY > DATA INTERFACES in each module…
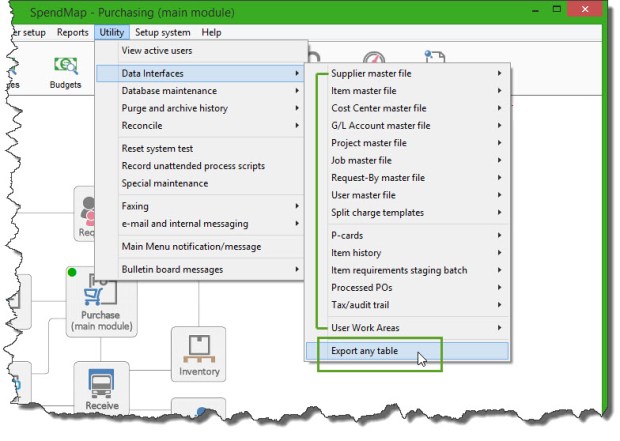
While you could use Export Any Table to export the same data that is available via the dedicated export utilities, the dedicated exports provide some additional features that might come in handy if you’re going to be doing this on a regular basis, such as…
Hope this help you pick the best tool for the job!
If you install the free version of SpendMap on a PC with an earlier version of Windows and then later upgrade the PC to Windows 10, you may need to reinstall SpendMap’s PDF printer driver. (more…)
We made two fairly significant improvements to the e-mail features in the Free Version of SpendMap (including v12.65)…
SpendMap now supports encrypted (SSL/TLS) connections to the mail server. Better security aside, we have been finding that more and more e-mail providers (like Google’s Gmail) no longer support unencrypted connections. If you previously had trouble getting SpendMap to work with your e-mail system, please try again after upgrading.
Note the new “Secure Connection” setting under the Server Name or IP Address field, in…
– PURCHASING > Setup system > e-mail settings
Please note that to send e-mail, SpendMap now requires the Microsoft .NET Framework v4.0 or above to be installed on the PC (available since 2010).
We normally don’t make changes to published versions of SpendMap but we made an exception in this case due to recent changes at Google and the increasing number of requests for this feature.
The free version of SpendMap now includes a free, built-in e-mail service, which you can use instead of configuring the system to use your own e-mail server or ISP.
Just enter “SpendMap” in the Server Name or IP Address field in E-mail Settings to use this free service (don’t worry about the other SMTP settings as they will be ignored when using the built-in e-mail service). The Online Help for the Server Name or IP Address field has additional details.
For new downloads of the free version of SpendMap, the Evaluation Copy is preconfigured to use this new e-mail service. If you already have SpendMap installed, your settings will not change automatically but you can manually change the Server Name or IP Address field per above if you want to use this free service.
It may seem like a small thing but lots of people rely on the Getting Started Documentation, so we thought we should mention that it was moved to the top of the Online Help…

Going forward, we’re going to be giving away the Purchasing, Receiving and Email Integration modules.
If you’re already using the free version of SpendMap with different modules, your system won’t change. New downloads, however, will have these modules.
If you have any questions, please use our Support Ticket System.
Chaim works in the security solutions industry in New Jersey and was asking how to include an account number for the supplier on the PO form…
“When I place an order, our suppliers would like to know our account number. In the Supplier information there are fields to enter Phone, Fax, but not our Account Number. The Account Number should appear on the PO.“
Great question, Chaim!
Most people use the Comment 1 field or the Delivery Note field for that, both of which can be renamed to “Account Number” or similar.
You can enter the supplier’s account number into either of those fields in the [Miscellaneous] folder of the Supplier Master File, and it will carry forward to the PO Header for each new PO for that supplier and will be available to print on the PO form…
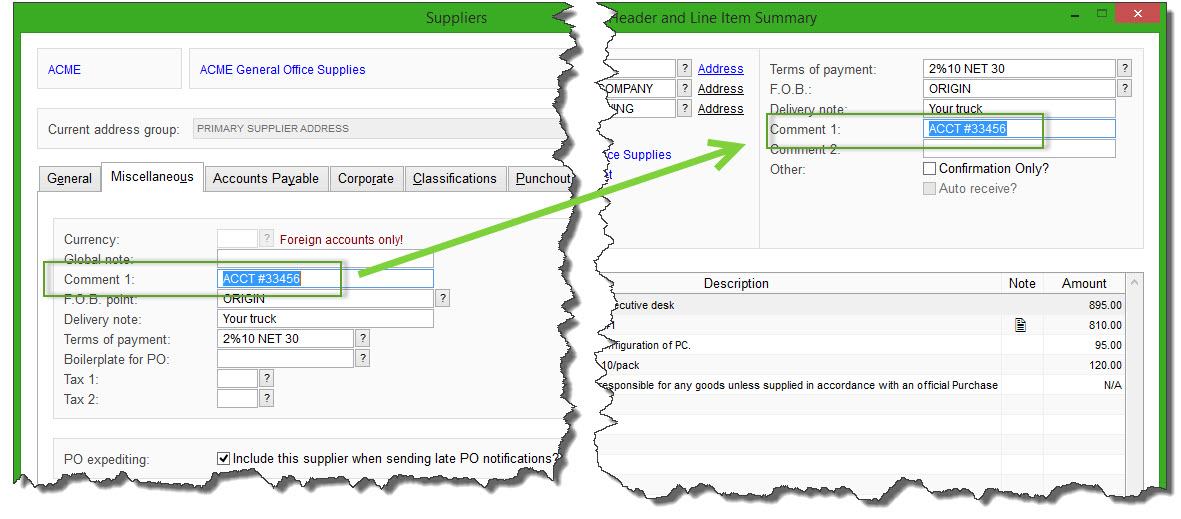
TIP: Make sure that the field that you use appears on your PO form layout. Delivery Note appears on form layouts 1, 2, and 5, where Comment 1 only appears on form layout 3. Of course, if you upgrade to the paid/commercial version of SpendMap, we can customize your PO form with any fields you like.
You can preview and/or select your PO form layout, using the [Change PO Layout Option] button, in here…
– PURCHASING > Setup system> Purchase order settings > PO printing settings > Settings
You can rename the field titles from “Comment 1” or “Delivery Note” to “Account Number”, which will update the field title in the Supplier Master File, as well as on the PO Header screen and the PO form itself.
Just go in here…
– PURCHASING > Setup system> Purchase order settings > PO printing settings > Text-Based Field Positions and Field Settings > Standard
…and change the Title of field #19 (Delivery Note) or #21 (Comment 1) , then exit and re-run SpendMap.
