user accounts

Restricting users to their own Purchase Orders in your Free PO Software

Do you have more than one person working in your Free Version of SpendMap?

Would you like to restrict their access so that they can only see their own POs or maybe their own department’s orders, for example, when receiving or checking the status of Purchase Orders?

Just use the Document Access setting, at the top of the [Permissions] tab in the User Master File…

This setting will restrict the user to the applicable Purchase Orders in the following areas of the software…

  • View Purchase Order Status
  • View Release Status
  • PO Acknowledgments
  • Receive PO
  • Reprint PO
  • Reprint Release
  • Cancel Purchase Order
  • Cancel Release
  • View Cost Center History
  • View Cost Center Budgets
  • Document Lookups (when searching for POs and other documents)

Who can add to Master Files on-the-fly in your Free Purchase Order Software?

Did you know that, by default, all users in your Free Purchase Order Software will be able to add suppliers, items, account codes and other Master File information “on-the-fly” as they work on Purchase Orders and other transactions in the system?

That’s right, while creating a new Purchase Order, if you type in a new supplier code, part number, account code, etc. that doesn’t already exist in the respective Master File, SpendMap will prompt you to add the information to the Master File right there-and-then, so you don’t have to stop what you’re working on in your PO Work Area.

Of course, you may not want everyone doing that, so you can turn this feature on or off, using the setting called “Allow adding of codes on-the-fly?”, which you can find in the [Permissions] folder/tab of the User Master File.

on-the-fly

Getting Unstuck in your Free Purchase Order Software

Scott works in the Adventure Park construction industry and got “stuck” in his PO Work Area while entering some new Purchase Orders in the Free Version of SpendMap.

“I cannot get out of the PO entry screen once I have entered a PO. I click [OK] once I have entered all the items I want on the PO and nothing happens.”

Scott reached out to us for some free tech support and we gave him a leg-up.

Overdoing it with the “Don’t ask me again” Feature

As it turns out, Scott had inadvertently used the “Don’t ask me again” feature to default/hide a pop-up prompt that’s supposed to be displayed when you save a PO.  Since he could no longer see the pop-up message, it seemed like nothing was happening when he clicked the [OK] button to save the PO.

So we advised our adventurous friend to use the following menu option to re-display the hidden pop-up message, so that he could UNselect to checkbox that hides the prompt…
– PURCHASING > User Setup > User prompts > Change prompt mode (show/hide prompts)

Show-prompt

…and he was back to work in a jiffy, processing Purchasing Orders for all the stuff he needs to build his pretty-darn-cool adventure parks.

How can we help you get unstuck today?

adventure

Enter vs. Tab Key in your Free Purchase Order Software

Did you know that you can customize how the <Enter> key works in the Free Version of SpendMap?

By default, both the <Enter> and <Tab> keys work the same way in SpendMap; they move you to the next data entry field, or save the screen if you’re on the last data entry field.

Using <Enter> to move through fields seems to be the preference for many users who do a fair bit of data entry.  Maybe this comes from using Excel, where <Enter> moves you down one cell in a spreadsheet.

But if you prefer, you can change the setting at the bottom of the [Settings] Folder in the User Master File, so that <Enter> always saves the screen, leaving only <Tab> to move between fields.

User Accounts in your Free Purchase Order Software (Video Tutorial, v14.5)

Here are some tips for setting up new users in the Free Version of SpendMap.

Your first user account will be created during the Setup Wizard that runs automatically when you log in to your Live Copy of SpendMap for the first time but if you need to add additional users, this new video tutorial is a good place to start…


Removing toolbar buttons in your free Purchase Order Software

Tom works in the hotel industry in Florida and asked how to remove buttons from the toolbar at the top of the Main Menu in SpendMap.

Toolbar Button

There are actually two ways to do that – you can remove toolbar buttons for only certain users or you can remove them altogether, for everyone.

By User

To remove a toolbar button from someone’s User-Definable Menus, use this…
– PURCHASING > User Setup > User definable menus and pop-up prompts > Add/Remove individual menus and pop-up prompts

Just remove the menu option associated with the toolbar button.  As a reminder, toolbar buttons are shortcuts to menu options in SpendMap, so if you take the menu away from the user, the toolbar button will also disappear automatically.

System-Wide

If you would like your users to have access to a menu option but prefer to NOT show the associated button in the toolbar, you can remove the toolbar button with this…
– PURCHASING > Setup system > User defined terminology and settings > Modify menu titles and toolbar buttons

Just UN-check the option to “Include this menu option on the toolbar” and the button will be removed from everyone’s toolbar but they will still be able to select the applicable menu option (unless you removed it from their user-specific menu, per above).

turn-off-toolbar-option


Administrator Accounts and your Free Purchase Order Software

When installing the free Windows/desktop version of SpendMap or when applying full-version upgrades like the recent v11.98-12.65 upgrade, the instructions will refer to an “Administrator account”.  For example, the instructions might say something like “You will need Administrator privileges in Windows to complete the upgrade” or “You will need Administrator privileges on your computer to perform the installation“.

(more…)

PO numbers by Ship-To location in your Free Purchase Order Software

Jody is using the free version of SpendMap to manage spending for a chain of bar/restaurants, and was wondering if there is a way to set up a separate sequence of PO numbers for each Ship-To location.

While there is no “direct” link between Ship-To locations and PO Number Sets, you can set up an indirect relationship by way of the user accounts.  That is, in the User Master File, you can 1) set up a default Ship-To for each user, and separately 2) assign each user a default PO Number Set.

If you do both those things for all users at a location, and assuming they don’t change the defaults when entering POs (and/or if you lock out those fields so that they cannot change from the defaults), then all POs for each Ship-To will also be for that PO Number Set…

PO-BY-SHIP-TO

Again, this is not a “hard relationship” (i.e. rule) in the software per se, it is simply one way to configure it.  That said, it seems to work well for most people who ask about this.

You can set up your Ship-To locations in here…
– PURCHASING > Master Files > Cost Centers > Add/Modify/Delete

You can set up your PO Number Sets in here…
– PURCHASING > Setup system > Incrementing document number sets > POs

You can specify the default Ship-To and PO Number Set for each user in the [Settings] Folder of the User Master File, in here…
– PURCHASING > User setup > Add/modify/delete users

And, if you want to, you can lock/restrict access to the PO Number Set field and/or the Ship-To field in the PO Work Area (so that users can’t change from their defaults), using this…
– PURCHASING > User setup > Field restrictions by user access level > Set field restrictions

Bob split and he has my Purchase Order

Have you ever encountered a situation where a Purchase Order or other transaction that you need is in someone else’s Work Area but that person is not available?

There are a few options in SpendMap for dealing with priority transactions when other users are either temporarily unavailable or have left your company without first delegating their work to others.

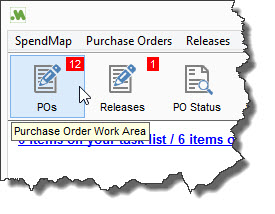
SpendMap includes a series of “Work Areas” that contain pending documents/transactions that you are working on (i.e. your work in progress). For example, your PO Work Area is where you can work on unprocessed Purchase Orders.

If you ever need to get a document/transaction out of another user’s Work Area, you can use the related “Transfer” utility to move the document from one user to another.  For example, to move a PO from one user’s Work Area to another, use this menu option…
> PURCHASING > Purchase Orders > Transfer POs to another user’s work area

Transfer PO to another user
Again, that is just one example.  Most documents/transactions include a Transfer utility, such as Requisitions, RFQs, Invoices, etc., which you’ll find right next to the menu to access the actual Work Area.

TIP: It’s fairly common for a System Administrator to remove the Transfer Utility when setting up some users’ profiles, so if you don’t see the menu option, ask your System Admin to adjust your User Definable Menus.

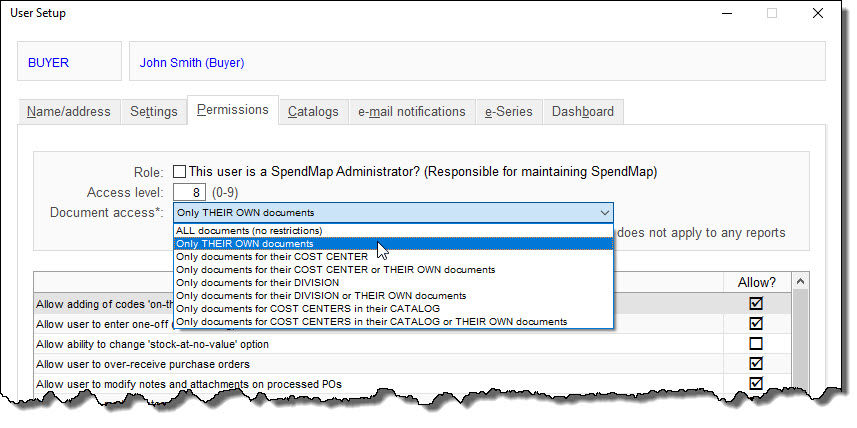
If someone leaves your company permanently without completing or delegating their work in SpendMap, you can either transfer the transactions in each Work Area individually, or you can just go ahead and delete the user’s account, in which case you’ll be notified that the user has pending transactions in their Work Areas, and you’ll be given the option to transfer all documents in all Work Areas in one shot.

If you have lots of users and aren’t quite sure where a document/transaction is (i.e. whose Work Area it’s in), try the Document Finder, which will search the entire system for the Purchase Order or other document number.  From any modules, select…
> Help > Document finder

Finally, if a requisition approver is out of the office (the most common reason why a document/transaction might get tied up), use the Proxy approver feature rather than a Transfer utility…
> REQUISITIONS AND APPROVAL > Approval > Enable proxy approver

…or you can upgrade to the web-based version of SpendMap, so that you can approve requisitions using your smartphone or tablet while on the road.

Hope that helps.