setup

PO numbers by Ship-To location in your Free Purchase Order Software

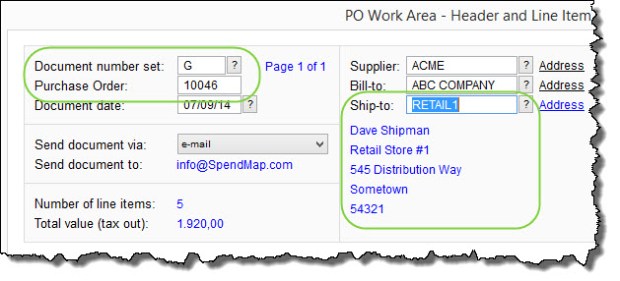
Jody is using the free version of SpendMap to manage spending for a chain of bar/restaurants, and was wondering if there is a way to set up a separate sequence of PO numbers for each Ship-To location.

While there is no “direct” link between Ship-To locations and PO Number Sets, you can set up an indirect relationship by way of the user accounts.  That is, in the User Master File, you can 1) set up a default Ship-To for each user, and separately 2) assign each user a default PO Number Set.

If you do both those things for all users at a location, and assuming they don’t change the defaults when entering POs (and/or if you lock out those fields so that they cannot change from the defaults), then all POs for each Ship-To will also be for that PO Number Set…

PO-BY-SHIP-TO

Again, this is not a “hard relationship” (i.e. rule) in the software per se, it is simply one way to configure it.  That said, it seems to work well for most people who ask about this.

You can set up your Ship-To locations in here…
– PURCHASING > Master Files > Cost Centers > Add/Modify/Delete

You can set up your PO Number Sets in here…
– PURCHASING > Setup system > Incrementing document number sets > POs

You can specify the default Ship-To and PO Number Set for each user in the [Settings] Folder of the User Master File, in here…
– PURCHASING > User setup > Add/modify/delete users

And, if you want to, you can lock/restrict access to the PO Number Set field and/or the Ship-To field in the PO Work Area (so that users can’t change from their defaults), using this…
– PURCHASING > User setup > Field restrictions by user access level > Set field restrictions

Using vs. Implementing your Free Purchase Order Software

needs-help

Brenda was struggling a bit with her implementation of the free version of SpendMap, so we helped her by providing free support when she had questions about setting up her Master Files, using the built-in integration tools, and otherwise configuring the system to her needs.

But she still had a concern…

I’m worried that if I’m having trouble, it will be impossible for our staff as they are not very computer savvy at all“.

Fair enough, but keep in mind that implementing a business application like this is more involved than just using it for your day-to-day work.  For example, entering a Purchase Order or Requisition in SpendMap is much easier than setting up the master files, going through system configuration, etc.

Our customers tell us all the time that their users can handle the “day-to-day” stuff, with no training at all!

And remember, with User Definable Menus, you can remove everything from your staff’s field of view that they don’t need, leaving only the few functions that they’ll use to do their daily tasks (e.g. Enter a PO or Requisition, check the status of their order, etc.).

But Brenda certainly has a valid point.  This type of system is definitely more involved to set up than, say, a simple word processor or something, that you can just install and start using.  There are configuration settings, workflow options, master files to populate, not to mention mapping the functionality to your business processes, which in and of itself can take some time.

All that said, keep in mind that there is definitely a big carrot to keep you motivated while you work get the system going.

On a separate but related note, we will soon be offering Getting Started training and implementation consulting packages for users of the free version (until now, these services were reserved for people using our paid version only).  Make sure to follow our Blog, where we’ll make the announcement when the Getting Started package is available.

Don’t give up folks.  Rome wasn’t build in a day.

Message about NtSetReg.exe after indexing system

If you have installed the free version of SpendMap on your network server for multiuser access, after reindexing the system you may see a message about running NtSetReg.exe to update registry settings on the server.

This is just a reminder – you do NOT need to run NtSetReg.exe each and every time you index the system.

When you originally installed SpendMap, you would have run NtSetReg.exe to set those registry settings on the server. We display that reminder message after indexing 1) if SpendMap is able to read the registry on your server and it sees that the required registry settings are not in place, or 2) if your network security settings are such that SpendMap cannot read the registry on the server to confirm that the settings are in fact in place.

So, again, you do NOT need to run NtSetReg.exe every time you index the system.


Screen Resolution Settings and your Free Purchase Order Software

We’ve had a few support tickets from people who are using the free version of SpendMap on Microsoft’s new Surface Pro Tablets, with the setting “Make text and other items larger or smaller” set pretty high (e.g. 150%).

Settings like this can affect SpendMap’s minimum screen resolution test, resulting in an error message that you don’t have the required minimum 1024×768 screen size.

If you get this error message, try adjusting that setting to 125% (or until you stop getting the message).

TIP: The higher your screen resolution, the smaller SpendMap (and other software applications) will appear on your screen.  Instead of adjusting your computer’s overall screen settings, you might also consider adjusting the “Font/screen scaling factor” in SpendMap, using setting #10 in Workstation Configuration Settings (PURCHASING > Setup system > Workstation configuration settings).  This will make SpendMap appear bigger on your screen, without affecting other apps on your PC.

screen resolution

Decimal places for price and quantity fields in your free PO System

By default, the Price and Quantity fields are set to two (2) decimal places in the Free Version of SpendMap (e.g. $123.12).

But when purchasing items with a very low unit price, you may need to increase the number of decimal places for prices, which you can do in here…
– PURCHASING > Setup system > User defined terminology and settings > User defined field settings

decimals in free PO system

You might also want to consider the unit of measure that you’re using.  For example, if you purchase by the thousand (M), you’d need fewer decimal places (e.g. $123.45 vs. $1.2345).  You can set up your units of measure in here…
– PURCHASING > Master Files > Units of measure > Add/modify/delete

Entering PO numbers manually in your free Purchase Order Software

Marsha works at a shipyard in Newfoundland, Canada, and was asking if she can enter her PO numbers manually, instead of SpendMap assigning the next Purchase Order number automatically for each new order.

Sure thing Marsha, you can enter your PO numbers manually on each new PO if you prefer.

The Setup Wizard, which runs automatically when you first run the Live Copy of SpendMap, will set up an “auto incrementing” sequence of PO numbers, since most people want that, but you can either;

  1. replace that auto-incrementing number with the option of manually entering your PO numbers, or
  2. you can set up multiple “PO Number Sets”, and one of the Number Sets can give you the next sequential number for each new PO, and you can use a separate PO Number Set that allows you to enter the PO numbers manually for certain orders when you need to.

You can change the settings in here…
– PURCHASING > Setup system > Incrementing document number sets > POs

If you want to enter your PO number manually, just enter “.” (a period, without the quotes) in the Next Number field, then select the check-box to “Allow user to modify number”.

PO number settings

MAPI vs. SMTP e-mail setup in your free PO Software


>>> 07/29/2015 update – The free version of SpendMap now includes a free, built-in e-mail service, which you can use instead of configuring the system to use your own e-mail server or ISP.  This post has details.  The balance of this post, below, still applies if you want to set the system up to use your own e-mail server or ISP.


Since we blogged last month about how to set up the e-mail module in the free version of SpendMap, we realize that the MAPI option might be better than SMTP for many smaller companies (the target market for the Free-Procurement Project).

Our suggestion in last month’s blog post to try the SMTP option first came from our Support Group’s experience with our paying customers, who mostly use the web-based version of SpendMap, and who usually have their own (internal) SMTP servers.  For these customers, SMTP is usually the best option.

But for smaller companies, who are more likely to use a third-party e-mail provider like Gmail, YAHOO mail, MS Live, etc., the SMTP option may not work as some hosted e-mail services don’t allow third-party apps to connect to their outgoing mail servers.

So, if you don’t have your own internal SMTP server, please give the MAPI option a try first, using the two fields at the top of the E-mail Setting Screen.

TIP: Assuming you have MAPI-compliant e-mail software (e.g. Outlook) installed on the PC that you’ll be using for SpendMap, setting the first two fields in E-mail Setting to the MAPI option is all that will be required.  In most cases, you do not need to enter any of the other MAPI-related settings further down the screen.  Any e-mail messages that SpendMap generates will be “handed off” to Outlook and will show in your Out Box until you hit [Send].

All the other instructions in that earlier blog post remain the same (e.g. other setup steps, testing, etc.).

Sorry for the false start, folks.  If you have any trouble, we’re always here to help.

Best regards,
The Free-Procurement Project team
Totally FREE software that automates Purchase Orders and a whole lot more
Powered by SpendMap