When installing the free Windows/desktop version of SpendMap or when applying full-version upgrades like the recent v11.98-12.65 upgrade, the instructions will refer to an “Administrator account”. For example, the instructions might say something like “You will need Administrator privileges in Windows to complete the upgrade” or “You will need Administrator privileges on your computer to perform the installation“.
Software Tips & Tricks
New Tutorial: Simple Requisition-to-PO Processing
We added a new feature in the 2014 Release to convert approved Purchase Requisitions into Purchase Orders, as soon as the last approval occurs, so you no longer have to run the Build PO Utility as a separate step.
We had a few requests for this feature from smaller companies that don’t have Purchasing Departments or dedicated Buyers (i.e. the Requisitioners are responsible for placing the orders once their Requisitions are approved).
The Tutorial also reviews a few other related features that are popular with smaller companies (and larger companies that have “end-user Purchasing”), so we rolled it all into this video, which we’re calling “Simple Requisition-to-PO Processing”.
Click the image below to watch the tutorial on YouTube, and don’t forget to visit our Channel to see 20 other video tutorials that will help you get started with the most popular features in your free Purchase Order system…

PO numbers by Ship-To location in your Free Purchase Order Software
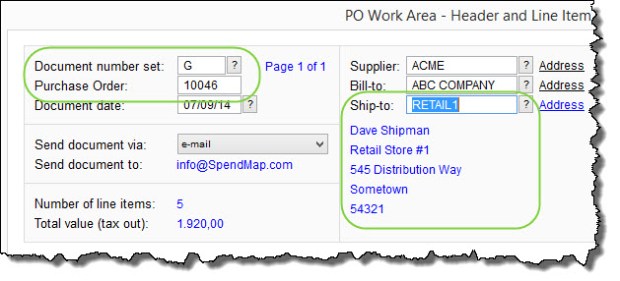
Jody is using the free version of SpendMap to manage spending for a chain of bar/restaurants, and was wondering if there is a way to set up a separate sequence of PO numbers for each Ship-To location.
While there is no “direct” link between Ship-To locations and PO Number Sets, you can set up an indirect relationship by way of the user accounts. That is, in the User Master File, you can 1) set up a default Ship-To for each user, and separately 2) assign each user a default PO Number Set.
If you do both those things for all users at a location, and assuming they don’t change the defaults when entering POs (and/or if you lock out those fields so that they cannot change from the defaults), then all POs for each Ship-To will also be for that PO Number Set…
Again, this is not a “hard relationship” (i.e. rule) in the software per se, it is simply one way to configure it. That said, it seems to work well for most people who ask about this.
You can set up your Ship-To locations in here…
– PURCHASING > Master Files > Cost Centers > Add/Modify/Delete
You can set up your PO Number Sets in here…
– PURCHASING > Setup system > Incrementing document number sets > POs
You can specify the default Ship-To and PO Number Set for each user in the [Settings] Folder of the User Master File, in here…
– PURCHASING > User setup > Add/modify/delete users
And, if you want to, you can lock/restrict access to the PO Number Set field and/or the Ship-To field in the PO Work Area (so that users can’t change from their defaults), using this…
– PURCHASING > User setup > Field restrictions by user access level > Set field restrictions
Message about NtSetReg.exe after indexing system
If you have installed the free version of SpendMap on your network server for multiuser access, after reindexing the system you may see a message about running NtSetReg.exe to update registry settings on the server.
This is just a reminder – you do NOT need to run NtSetReg.exe each and every time you index the system.
When you originally installed SpendMap, you would have run NtSetReg.exe to set those registry settings on the server. We display that reminder message after indexing 1) if SpendMap is able to read the registry on your server and it sees that the required registry settings are not in place, or 2) if your network security settings are such that SpendMap cannot read the registry on the server to confirm that the settings are in fact in place.
So, again, you do NOT need to run NtSetReg.exe every time you index the system.
Exporting Data to Excel from your Free Purchase Order Software
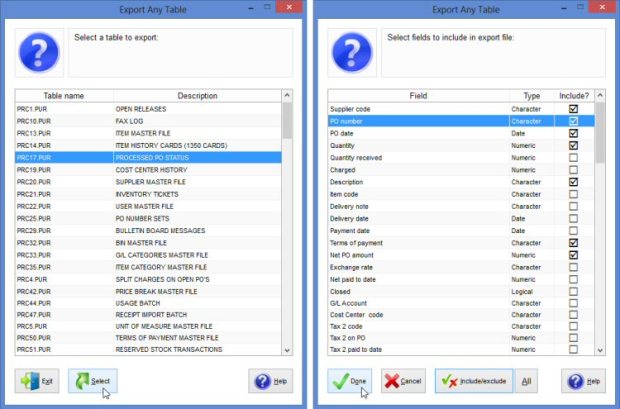
Aaron in California was looking for a report showing both the Base Unit of Measure as well as the Purchasing Unit of Measure for each item.
Since we don’t have a report like that, we pointed him to the following utility, where he can export his Item Master File (or any other data) to Excel, including whatever fields he needs…
– PURCHASING > Utility > Data Interfaces > Export any table
Aaron replied with “Yes this was helpful. I see how I can create an endless number of reports using this“, which got us thinking that this would be a good topic for a blog post. Thanks for the inspiration, Aaron.
So while we put that utility under the “Interfaces” section (since it’s a “data extract” utility), by all means feel free to use Export Any Table for ad-hoc reporting if there’s something that you’re looking for that isn’t on one of the system’s 100+ built-in reports.
Help and Getting Started Documentation for your Free PO System
Marsha is implementing the free version of SpendMap at a university in Washington state and had this question about the Getting Started Documentation that comes with the free software, and how it relates to the rest of the Online Help…
“Since I have figured out that some items in the Getting Started documentation do NOT apply to the free version, I thought I would check to find out if these items in the “Network Installation Instructions” apply…”
Thanks for this great question, Marsha.
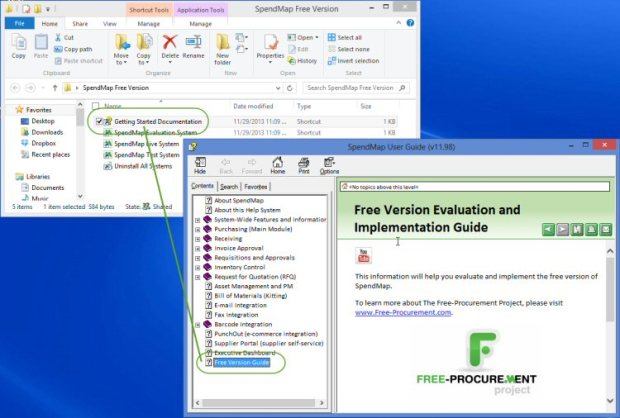
As it turns out, everything in the Getting Started Documentation is specific to the Free Version only, and does not apply to the Paid Version of SpendMap.
For clarity, the shortcut/icon called “Getting Started Documentation” will bring you to a section of the Online Help called “Free Version Guide”, which is but one of many sections in the overall Online Help System. See screen shot, below…
So while it’s true that the other sections in the Help apply to both the Free and Paid Versions of SpendMap (which offer similar functionality), absolutely everything in the “Free Version Guide” (i.e. the Getting Started Documentation) applies to the Free Version exclusively.
Sorry if this caused any confusion. Since the Free and Paid Versions offer the same functionality, it made sense to create a single Help System for both versions, and just add some additional/supplemental content for the Free Version to help you get started.
Adding Logo to Purchase Order and Other Forms
We’ve had a few support tickets from people asking how to add their company logo to Purchase Orders in SpendMap.
You will be prompted to select your logo during the Setup Wizard that runs automatically when you log into the Live Copy of SpendMap for the first time.
If you missed that part of the Setup Wizard or if for some reason you want to change the logo in the Evaluation Copy (with the sample data), just use the [Change PO Layout Option] button in here…
– PURCHASING > Setup system> Purchase order settings > PO printing settings > Settings
On that screen, click the link “Select my company logo”, and you’ll be prompted to upload an image file (JPG, GIF or BMP file).
![]()
Screen Resolution Settings and your Free Purchase Order Software
We’ve had a few support tickets from people who are using the free version of SpendMap on Microsoft’s new Surface Pro Tablets, with the setting “Make text and other items larger or smaller” set pretty high (e.g. 150%).
Settings like this can affect SpendMap’s minimum screen resolution test, resulting in an error message that you don’t have the required minimum 1024×768 screen size.
If you get this error message, try adjusting that setting to 125% (or until you stop getting the message).
TIP: The higher your screen resolution, the smaller SpendMap (and other software applications) will appear on your screen. Instead of adjusting your computer’s overall screen settings, you might also consider adjusting the “Font/screen scaling factor” in SpendMap, using setting #10 in Workstation Configuration Settings (PURCHASING > Setup system > Workstation configuration settings). This will make SpendMap appear bigger on your screen, without affecting other apps on your PC.

How rejected requisitions affect budgets in your free Purchase Order Software
David works at a government agency in Texas and was wondering why rejected requisitions still show as commitments to the cost center’s budget.
Based on the settings in the Requisitions and Approvals Module, rejected requisitions will stay in the budget temporarily because often the Requisitioner will modify and re-process the requisition (e.g. try again with a different item or otherwise clean up whatever the Approver didn’t like). So SpendMap will keep the budget “reserved”, to avoid that part of the budget being picked up by someone else, and therefore reduce the chance that the original Requisitioner will be “out of budget” when they try again.
But if they don’t want to try again, they can either 1) delete/cancel the requisition, or 2) there is a setting to “auto-delete” rejected requisitions after a certain number of days, which will eliminate that additional step, or if the user just forgets to cancel the Requisition. You can find that “auto-delete” setting in here…
– REQUISITIONS AND APPROVAL > Setup system > Miscellaneous settings
Reminder: Users will see rejected requisitions the next time they go into their Requisition Work Area. If you would like to be a bit more proactive, just enable this e-mail notification…

Decimal places for price and quantity fields in your free PO System
By default, the Price and Quantity fields are set to two (2) decimal places in the Free Version of SpendMap (e.g. $123.12).
But when purchasing items with a very low unit price, you may need to increase the number of decimal places for prices, which you can do in here…
– PURCHASING > Setup system > User defined terminology and settings > User defined field settings

You might also want to consider the unit of measure that you’re using. For example, if you purchase by the thousand (M), you’d need fewer decimal places (e.g. $123.45 vs. $1.2345). You can set up your units of measure in here…
– PURCHASING > Master Files > Units of measure > Add/modify/delete
